Concrete surfaces require repair for a variety of reasons. Age, weathering, heavy traffic and poor construction all contribute to damage.

Using the right techniques will result in repairs that last. For major structural repairs, professional assistance should be sought. Contact Concrete Repair Bismarck for professional help.
Identifying the type of damage is essential for a successful repair. Sounding the surface with a rod and hammer produces a clear response in sound concrete and a dull response in delaminated areas.
Concrete is used in a variety of areas around your home, including the foundation, driveway and porch. While it is a strong material, it is not indestructible and will show signs of wear over time. Surface damage can become unsightly and lead to safety issues, so it is important to take the time to repair these problems before they become worse.
There are many different products on the market that can be used to repair surface damage. Some are simple to use and require no tools other than a putty knife or scraper, while others are more complex and have specific requirements when it comes to preparation and curing. In any case, a thorough inspection of the damage should be made to identify the type of repair necessary.
Once the type of repair is determined, it is important to prepare the surface for application. This includes cleaning the area to remove dust, dirt and oil from the concrete. This can be done using physical methods such as sandblasting or grinding, or chemical solutions. This step is crucial as the concrete will not bond properly to a dirty or contaminated surface.
After the surface has been cleaned, it must be brought to a Saturated Surface Dry (SSD) state. This means that the pores in the concrete are filled with water, but the surface is not damp to the touch. This allows the repair material to fill the gaps in the concrete without creating air pockets, which could weaken the surface over time.
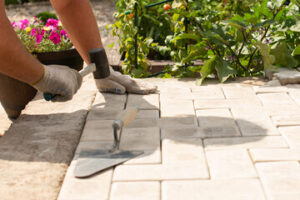
Finally, the concrete patching product should be applied and smoothed. A trowel is typically used to ensure that the patch is level with the existing concrete, and a broom may be needed for large surfaces. The patching material should then be rodded to eliminate air bubbles and promote a strong bond. The repair should then be allowed to cure.
While it may be tempting to procrastinate when it comes to concrete repairs, addressing damage early on can prevent costly replacement projects. Even small cracks and pitting can deteriorate over time, so it is essential to keep an eye on the condition of your concrete and address any issues promptly.
Structural Repair
When a concrete surface is damaged beyond mere cosmetic concerns, it can pose serious safety risks. Structural damage may involve cracks that compromise the integrity of a structure, or it can result in surface displacement and structural movement. In these cases, it is important to seek professional assistance and guidance in order to address the problem quickly and effectively.
There are several types of concrete repair methods available, depending on the type and extent of damage. Surface repairs are typically used for minor problems such as cracks, spalling, and surface wear. This type of repair involves filling in the damaged areas with a patching material to restore the appearance and strength of the concrete. This method is not ideal for structural issues, and it is likely to require repeated applications over time.
For more significant structural damage, a partial-depth repair might be required. This method is designed to address cracks that extend below the surface of the concrete and are located within sound concrete. The best way to determine the soundness of a concrete surface is to “sound” it with a steel rod or ball-peen hammer. Sound concrete will produce a clear ringing response, while unsound concrete will have a dull sound. Once the unsound concrete has been identified, it can be removed and replaced with high-strength concrete.
A proper bond is necessary between new and existing concrete, and this is often achieved by using a bond coat that consists of a mixture of sand and cement. The thickness of the bond coat should be roughly equal to the thickness of the concrete that it will cover. The bond coat should be thoroughly troweled and leveled to ensure maximum adhesion between the two materials.
While it is common for structural damage to occur over a long period of time, there are some instances that call for prompt action. These include if the structure is showing signs of increased movement, if there are large cracks that are spreading rapidly, or if a large amount of concrete has become deformed or has fallen off. It is also important to identify the cause of the damage and correct it accordingly, as failure to do so could lead to additional problems and potential safety hazards.
Repairing Cracks
Cracks are some of the most common problems that can arise in concrete surfaces. However, if you take the time to evaluate the situation properly, it is often possible to repair these cracks without too much expense or disruption. First, it is necessary to identify the cause of the cracking. If the cracks are caused by ground movement, for example, then any repair may be ineffective until these issues are addressed. Then, the suitable method can be selected to repair the cracked surface.
When repairing cracks, it is important to clean the area thoroughly to ensure that the filler will adhere. This is done by brushing or pressure washing the damaged areas and removing any loose material. In some cases, a chisel or light hammer can be used to chip away the crack edges. A backward-angled cut is best, as this prevents the crack from reverting to its original position after it has been repaired. It is also a good idea to remove any loose gravel that has fallen into the crack as this can prevent the filler from bonding to the main concrete structure and could lead to failure in the future.
It is then a good idea to seal the cracks with a product that will prevent moisture penetration and provide a barrier to vapor emissions. This can be a caulk, polyurethane or epoxy-based product. Ensure that the product is designed for concrete use, as some are not and can degrade over time. Finally, it is a good idea to apply a pre-mixed bonding adhesive, which will improve the adhesion and durability of the repaired concrete.
If the cracks are primarily cosmetic in nature, it is often possible to make them less noticeable with a repair material such as sand or mortar. This can be especially effective for striations or tripping hazards that are created by the cracks.
It is vital to regularly assess the condition of all concrete surfaces and address any damage as soon as it is detected. This will help to prevent further damage and reduce the need for frequent repairs. By taking the right precautions, allocating adequate time and budget, considering professional assistance when necessary, and avoiding common mistakes, it is often possible to make repairs that will last for a long time.
Sealing
When it comes to completing any concrete project, especially one that involves new construction or repairing old damaged concrete, sealing is not an optional step. In fact, it’s a vital component to the entire process that helps protect your investment and extend the lifespan of the finished product.
The first step in preparing to seal your concrete is cleaning the surface thoroughly. This typically means removing any existing sealers, dirt, moss or debris. This is important to help ensure the new sealant adheres properly and stays fresh. After cleaning the surface, you should allow it to fully dry before beginning the sealing process. Depending on the weather and temperature, this can take from a few hours to a few days. It’s also a good idea to keep foot and vehicle traffic off the concrete during this time.
Hairline cracks can form in concrete surfaces for a number of reasons. They could be caused by contamination such as grease, salt, or mildew. They may also be the result of weather exposure or by absorption of water into the cement. Regardless of the cause, they can lead to further damage by creating a path for moisture migration into the interior of the structure. Sealing can help prevent this by creating a barrier that can resist the penetration of moisture and other contaminants.
For this type of repair, you will need to use a concrete filler or repair compound that’s designed for the specific type of concrete and its exposure. Once you’ve applied the filler, you should use a trowel or putty knife to smooth the surface. Then, you should let the material cure according to the manufacturer’s instructions. Once it has set, you can apply a concrete sealer to the surface.
Stain Resistance and Easier Maintenance
Aside from the benefits of stopping moisture migration, a sealed concrete surface offers several other advantages. For example, a concrete sealant can provide an effective barrier that helps to protect the concrete from staining caused by oil, chemicals and other substances. This can make regular maintenance tasks like sweeping, mopping and pressure washing easier and more effective. In addition, a concrete sealer can offer UV protection to protect the concrete from damaging effects of sunlight, such as fading and discoloration.